Pumping the Pool
How to remodel a swimming pool? First, choose a company to inspect your site. You need to determine if there is groundwater and whether the chlorine has been neutralized before pumping. A warning sign is if the company suggests using your pool pump for the job, as this can strain the equipment.
Table of Contents
ToggleHollow Spots on the Plaster
After emptying the pool, check the plaster and tiles for hollow areas. You can do this by sliding a metal roller handle across the surface. A clear difference in sound will indicate well-bonded plaster versus hollow plaster. If you’re re-tiling, use a hammer to test for loose tiles. If you aren’t re-tiling, there’s no need to inspect the waterline tile.
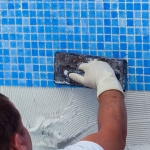
Re-tiling Old Tile
Before re-tiling, the contractor should repair any loose tiles. To prepare the old tile, they will use a diamond grinder, ensuring the new tile adheres properly. Tiling over old tiles during replastering enhances the appearance and prevents an obvious “replastered” look.
Pool & Tile Grinder
The contractor will grind the bottom of the tiles to ensure a thick enough layer of plaster adheres to them. This step is crucial for creating a watertight seal. Remember, the tile-to-plaster connection will be less noticeable underwater, which helps to minimize visibility.
Sandblasting or Chipping
Plaster can fail due to a poor chemical balance or when chemicals are added without dilution in water. (DANGER: NEVER POUR WATER INTO POWDERED POOL CHEMICALS; ALWAYS POUR POWDERED CHEMICALS INTO WATER.) If the plaster is soft, sandblasting may be necessary. If a screwdriver easily penetrates the plaster, it’s too soft. Re-plastering over soft plaster without removal won’t give the new plaster its full lifespan, and delamination may occur within a few decades.
Bond Coating
I have noticed several companies skip the bond coat on swimming pools, likely to save time and money. A bond coat costs about $300 for materials and one laborer’s salary. I advocate for doing the job right. This coat helps prevent future delamination, especially after the warranty period ends.
Tile, Water Line, Step, and Tile
If it were up to me, I would always choose new tiles over reusing existing waterline tiles. When replacing the old tiles, this option is ideal. Check the tiles for hollowness or looseness. If any tiles are hollow or loose, remove them. Do not allow your contractor to use caulk; they should apply the tiles with a trowel, similar to how thin-set floor tiles are applied. A single spot of caulk won’t stop water from flowing behind the tiles, making leaks harder to detect.
Step Tile
How to remodel a swimming pool? If your contractor does not include new step tiles in their estimate, they may later try to charge extra after emptying and dismantling your pool. Be cautious, as they may not prioritize the quality of their work.
Cracked Tile
The image on the right shows two potential causes for cracked tiles. To address this, the pool builder must either pour a cap over the bond beam (which may be short) or pour it alongside the pool deck. A horizontal crack is likely to appear after the deck pour. A short beam could result from changes in soil height after the pool shell was installed or due to a builder’s oversight. Fixing this issue will take more time and cost more. The rebar must be doweled into the side or top of the beam, and a concrete cap should be poured on the back of the beam.
Plaster
Pool plaster comes in various types, including granite, quartz, river stone, or glass beads, with mini pebbles closely following. Glass options can increase in price by 50% to 150%, depending on the color. Most contractors prefer one or two brands, so be sure to check online reviews of plaster brands to make an informed decision.
Contact us today!
Coastal Oasis Pools has been Florida’s top luxury pool builder for more than 25 years. Thousands of families have benefited from our services in South Florida. We will build you the most beautiful and luxurious home retreat. Contact us now! Learn more swimming pool and spa construction.